By Todd Ogasawara Jan. 13, 2007
MobileViews.com
If you know enough to ask about configuring a Windows Mobile Pocket PC or Smartphone for email using an IMAP4 server, you probably already know a lot. So, I’m not going to waste time explaining what IMAP4 is and why it is better to use than a POP3 server on a Windows Mobile device. So, let’s get configuring.
There is no special trick to using an IMAP4 mail server with Windows Mobile 5. The Microsoft Messaging setup wizard does a reasonably good job of asking for the necessary information and leading you through the process. I recommend you read through this entire article before trying to configure your device. I’ll point out the information unique to your setup that you will need to get from your email service provider.
This example uses a Pocket PC Phone Edition. However, the configuration is the same for a Windows Mobile Smartphone. Note that mymail.com is just an arbitrary host name used an example here. It is not in anyway related to the actual mymail.com site and their service.
Step 0. Select Messaging from the Start Menu (or Programs pages on a Smartphone).
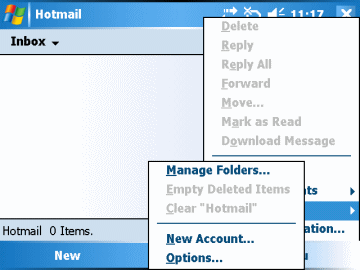
Step 1. Select Menu, Tools, and then New Account. You should see something like the screen below.
Step 2.Setup 1/5 Enter your full email address for this account.

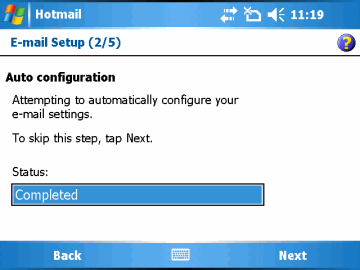
Step 3. Setup 2/5. As far as I can tell this is a useless step. I have never seen anything autoconfigured at by this point. Just click Next to continue.
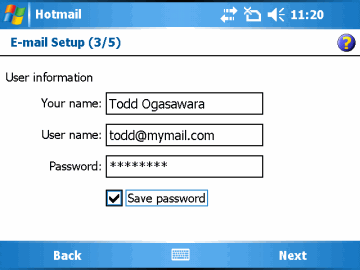
Step 4. Setup 3/5. In my experience, the user name is usually your full email address. However, this is not always the case. It may be some variation of it such as your email address with a percent sign (%) substituted for the at-sign (@). Or, it may be a completely different name. Check your email service’s documentation to make sure you get and enter the correct account name. I have my email set to auto-check my email reguarly throughout the day. If you plan to do this, make sure you check the Save password checkbox.
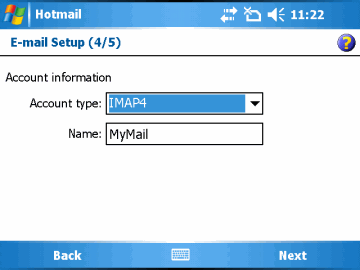
Step 5. Setup 4/5. The Account Type defaults to POP3. Just use the pull-down menu to select IMAP4.
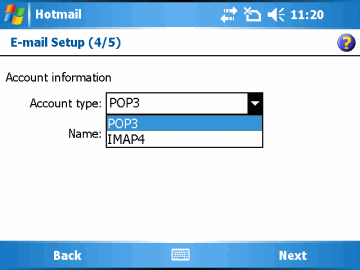
Step 6. Still on Setup 4/5. Type in an appropriate Name for the account. This Name is the identifier you will see in your Messaging Accounts list. So, select a name that make sense to you.
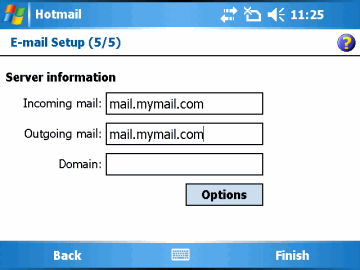
Step 7. Setup 5/5. You need to check with your email service provider to make sure you get the correct server names for the Incoming and Outgoing mail servers. The Incoming server is the name of your IMAP4 server. The Outgoing server name is the name of your SMTP gateway. Some email service use different names for these two servers. Others use the same name. You can leave the Domain field blank. Don’t let the Email Setup (5/5) title at the top fool you. You are not done yet. Keep reading and looking at the screenshots. Now, click on the Options button at the bottom right of the screen.
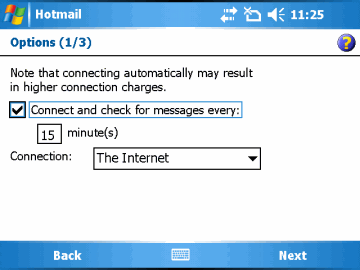
Step 8. Options (1/3). If your device is NOT a phone-type device (Pocket PC Phone Edition or Smartphone), you should probably leave the Connect and check checkbox unchecked. If you don’t have an unlimited data plan for your phone service, you may want to also consider leaving it unchecked or selecting a longer period between email checks. Leave the Connection type as The Internet.
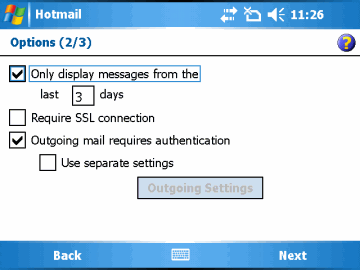
Step 9. Options (2/3). You can decide for yourself how far back in time you want to see email. Just remember that the more days you opt for, the more time it may take to check email. Check with your email service provider to learn if they support SSL (Secure Socket Layer) connections or if they require authentication for outgoing email. In my experience, most services do not provide SSL and do require authentication for outgoing email.
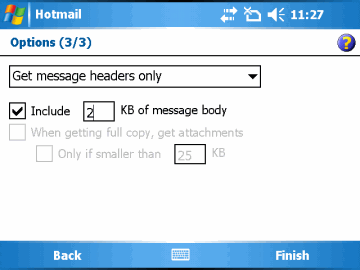
Step 10.Options 3/3. Take a look at the screen below and decide for yourself what works for your mobile email needs. I tend to increase the size of the included message body to about 3 to 4KB. But, you may not find that necessary. After you take care of the options on this screen, click on the Finish button and you are done.
That’s it. You should be able to retrieve email using an IMAP4 server and send email using a SMTP gateway.
Thanks for this article.
I was wondering if I need an exchange server (hosted or otherwise). And do you know if a Moto Q flashed from Verizon to Cricket would work with push mail or “like push mail applications? 2006 version of Moto Q WM 5.
Thank you, Darin
Pingback: MobileViews Blog :: Q&A: How to Configure Email for an IMAP4 Server